Research Ethics Application System guide for applications
1. What the Research Ethics Application System is for
An ethics review by the Human Research Ethics Committee (HREC) is required for research projects which involve the collection of data or biological samples from human participants. The Research Ethics Application System allows users to submit ethics applications and related documents to the Human Research Ethics Committee for review.
The online ethics application system provides a single-entry form called a ‘project’, which will guide an applicant to the most appropriate process based on how questions are answered. The number and type of questions asked will vary depending on your responses. Please ensure you answer all questions asked as fully as possible.
The Research Ethics System should also be used for submitting a project amendment for Human Research Ethics Committee review, or for submitting a final report when you have concluded your project. For further guidance on what constitutes a project amendment, please see the Human Research Ethics website.
2. Who can use the Research Ethics Application System
The Research Ethics Application System is automatically accessible to all Open University (OU) staff and postgraduate researchers using their Open University Computer Username (OUCU) and password. If you are an OU staff member needing to carry out research and do not have automatic access, please contact the HREC team with details of why System access is needed.
The Research Ethics Application System should not be used for taught undergraduate or master's level ethics applications. Please refer to the information on Human Research Ethics in Undergraduate and Taught Postgraduate student projects on our website. For further guidance, contact your tutor or module team.
Please note the Research Ethics Application System will be referred to as System for the remainder of this document.
3. What the System looks like
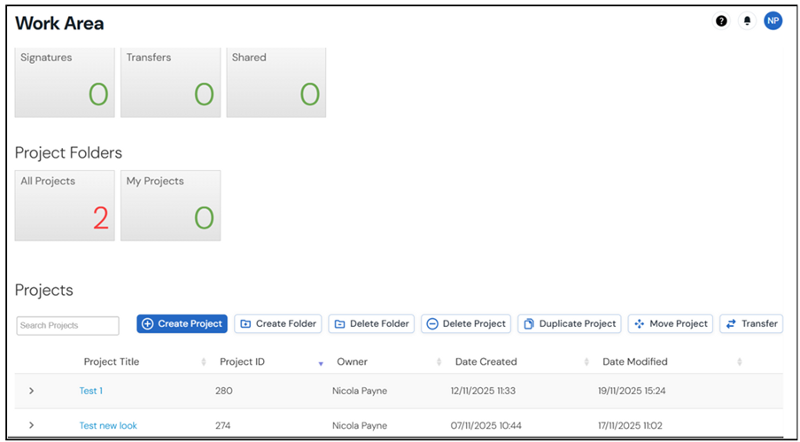
When you log into the system, you will be taken to the 'Work Area' (Screenshot 1.1). This page provides an overview of the projects applications you have created in the application system and provides the navigation tools you will need to use.
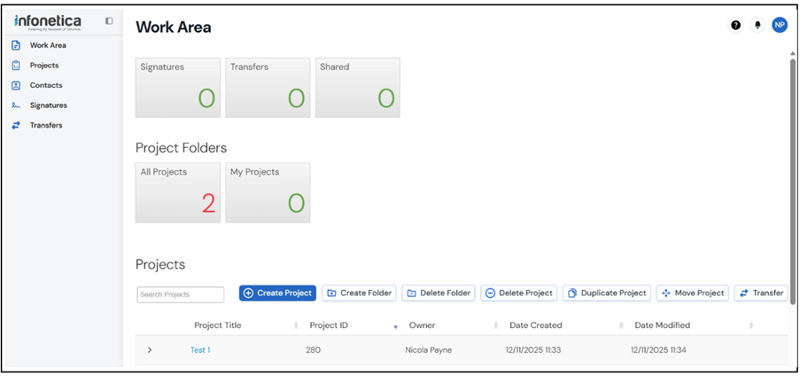
3.1 Work Area
Under 'Work Area' you will see a number of different options. In Screenshot 1.1 you can see that the user has 'Signatures', 'Transfers' and 'Shared' shown.
Notifications
Notifications can be accessed from under the bell icon on the top right of the page (screenshot 1.1). This is the record of notifications you have received about the project applications you have created. You will also be able to download a copy of your favourable opinion letter from this area once your project has been issued one. All notifications are sent to your OU email account and a record of these are retained in the system.
Please be aware that notifications will come from an @infonetica.net email address, who are the third-party supplier of the software. You may need to check your junk or spam folder if you do not receive notifications.
Signatures
If you are conducting research as a postgraduate researcher, any project you create will need to be countersigned by your supervisor. A record of your signature requests to your supervisor are recorded under this tile. Details of how to request a signature from your supervisor can be found in section 4.2.
Transfers
The application system allows you to transfer a project you are creating to another member of your research team to complete. It will also show a list of project applications transferred to you from another user. Details of how to transfer a project can be found in section 11.
Shared
The application system allows you to share your project with someone else before you submit it to HREC. You might use this feature to share your application with your supervisor if you are a postgraduate researcher or with another member of your research team. As the creator of the project, you can grant the appropriate level of access for the person you are sharing with. Details of how to share a project can be found in section 10.
3.2 Project Folders
These folders retain a copy of all project applications you have created. You can navigate to a previously completed project or a project you are still working on. Project applications can be created and saved to be completed at a later date if needed. If a project submitted to HREC is returned to you for information to be added, you can locate the project using the 'All Projects' tile (Screenshot 1.1).
3.3 Navigation tools
To carry out actions in the system, a toolbar will appear under the 'Projects' heading on most screens (Screenshot 1.2).

Create Folder
By default, you will have a folder called 'All Projects', where all the project applications you have created will be stored. Over time, you may have multiple project applications and want to store these in named folders. You can customise your 'Work Area' by creating a project folder(s). In Screenshot 1.1 the My Projects folder has been created in this way. If you want a particular project application to appear in a customised folder, you should create the folder and open it before you click on 'create project'. This will automatically add that project application to the folder. Project applications created in the main work area will appear under 'All Projects'. If you want to move an existing project to a sub folder, you will need to use the 'Move Project' tool.
Delete Folder
You can delete empty folders. Folders containing a project application cannot be deleted without first deleting the project applications inside.
Please note if you delete a project application it is deleted from the entire system, not just the folder. If you want to keep the project, you will need to move it to another folder using the 'Move Project' tool before deleting the folder.
Create Project
The create project option is the tool you are likely to use the most and is used to create your project applications.
Delete Project
If you create a project application and decide you no longer need it, you can delete it using this tool. You should only delete a project application that is no longer required, as it will be removed from the system. Once a project application is submitted for review it can no longer be deleted. If you need to withdraw a project application which is under review but has not yet been issued with a favourable opinion, please contact the HREC team for advice.
Duplicate Project
It is possible to duplicate a previously completed project application. For example, if a new project you are submitting contains much of the same information as in a previous project application, you can reuse it in a new project application. Please note, however, that it will show as a new project application and will not be linked to the previous project application. If you need to resubmit a project application because it has been amended, you should use the amendment sub-form (section 8).
Move Project
If you want to move a project application into a sub-folder, you can do so by using the 'Move Project' tool. You will need to create a sub folder first using the 'Create Folder' option.
Transfer
You can use this tool to transfer a project application to another user. Details of how to transfer a project application can be found in section 11.
4. Completing the ethics application online project application form
The system refers to an ethics application form as a project. Throughout this document your ethics application form will be referred to as a project application.
To create a project application, from your 'Work Area' click on the 'Create Project' option under 'Projects' (screenshot 1.1)
Enter your project title in the indicated box (Screenshot 1.3). You may need to use a shortened title if your project title is very long. You will be given the opportunity to enter a longer title in the project application form if you need to.

Under 'Form', select the dropdown arrow on the right-hand side and select 'Main Application' (Screenshot 1.4). Click on the blue 'Create' box to create your project application form.

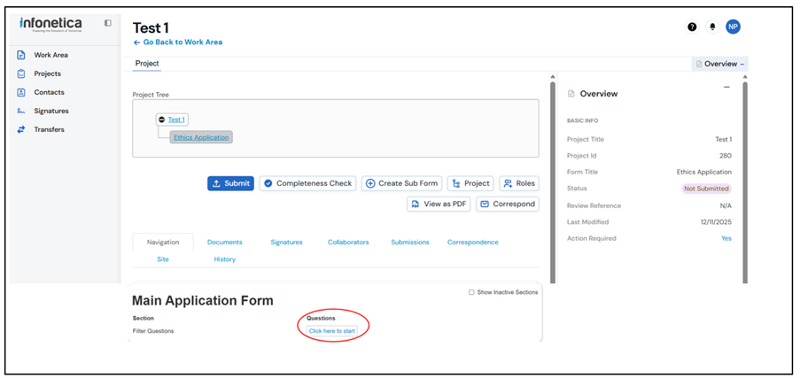
You can see that project application named 'Test 1' has been created (Screenshot 1.5). Each project application is given a unique reference number which you should use when communicating with the admin team. In this case the project is 280, which is displayed in the 'Overview' menu on the right-hand side of the page (Screenshot 1.5). This menu can be minimised by clicking on the minus sign next to 'Overview' and maximised by clicking on the plus sign.
To begin filling in the project application click on the 'Click here to start' (circled in red) hyperlink which appears under the 'Main Application Form'. This will open the first question (Screenshot 1.5).
The project application contains a series of filter questions (Screenshot 1.6). The number and type of questions asked will depend on the answers you select. You should complete all questions as fully as possible. Most questions are compulsory, and you will not be able to submit the project application if a compulsory question is left blank. On the rare occasion a question is not relevant to your project, please enter N/A in the text box provided.
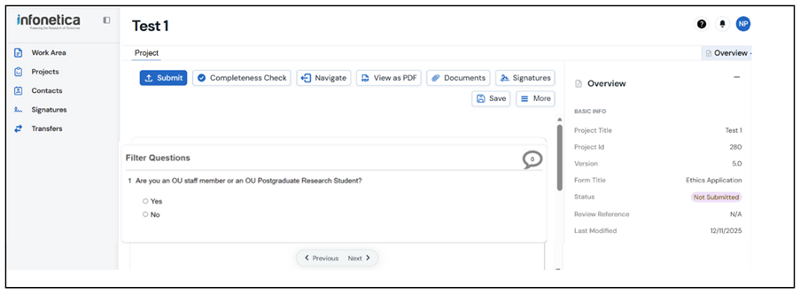
To navigate through the project application, use the 'Next page button' which will appear at the bottom of the page after each set of questions.
If you need to come back to your project application later when you are part way through completing it, click on the 'Save' option under projects (screenshot 1.6). This will save your answers. Please note that if only some of the questions on the page have been answered when you press save, these responses may not be saved. It is recommended to save when you have a completed a page and before starting the next page.
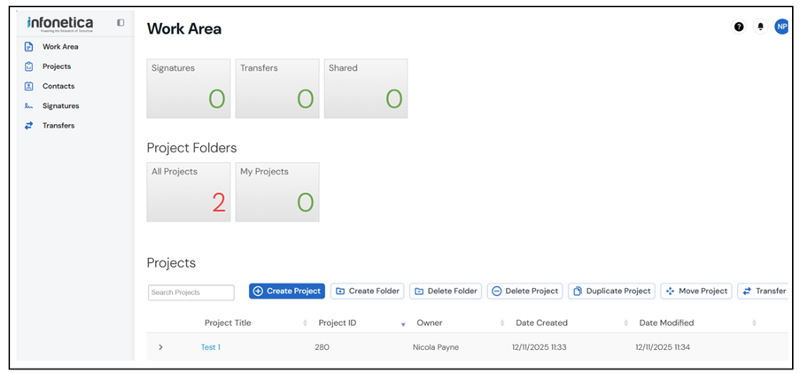
You can return to a project application you have already created and saved, under 'Projects' on the main 'Work Area' page (Screenshot 1.7). Project applications listed can be selected by using the 'Project Title' hyperlink.
This will reopen the project application and you can review the questions already completed and continue from where you left off, by using the hyperlinks under 'Main Application Form' (Screenshot 1.8).

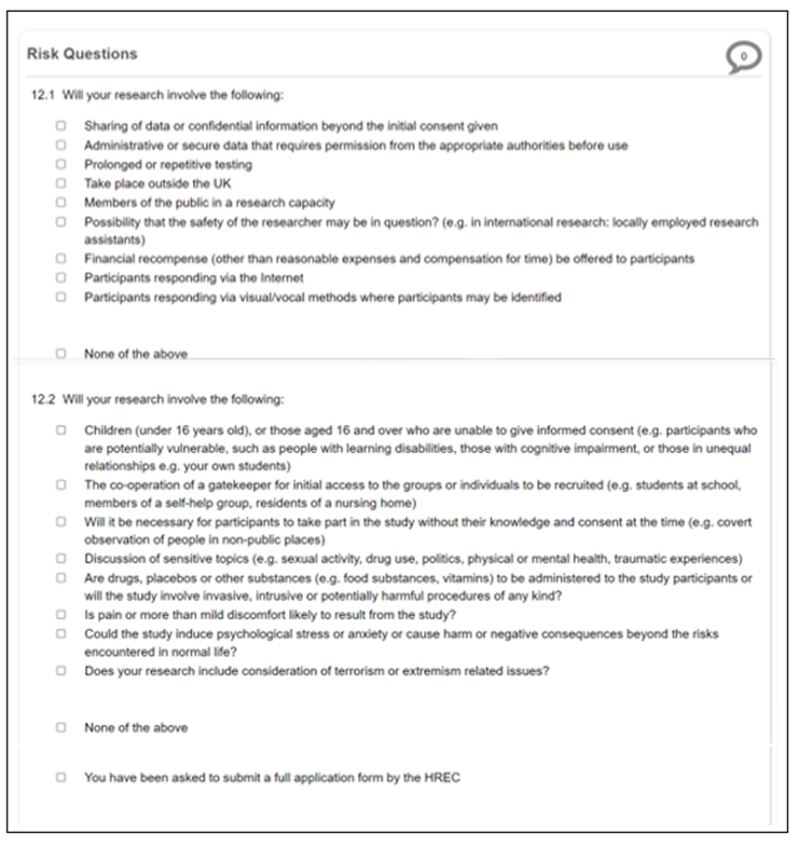
The Research Ethics Application system guides you to the appropriate project application depending on the answers supplied to the Risk Questions (Screenshot 1.9). You should tick all statements that apply for questions 12.1 and 12.2. If any of the statements in 12.2 apply to your project application, you will automatically be directed to the full set of high-risk project application questions. If none of these apply, a shortened number of questions will be asked as part of a low-risk application. The exception to this is if you were to tick 'You have been asked to submit a full application form by the HREC'. This will also generate a high-risk project application regardless of whether any of the 12.2 options are ticked. This option should only be ticked if your project application has been returned by the HREC requesting a full review is completed (section 5.2)
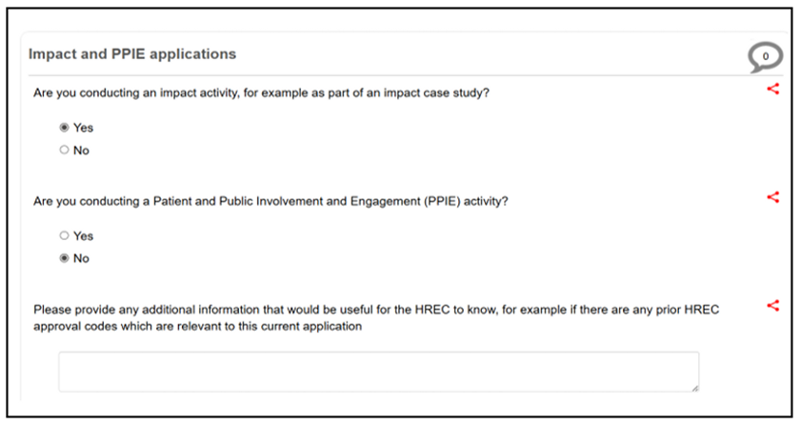
Impact and Patient and Public Involvement and Engagement activities
Researchers carrying out Impact and Patient and Public Involvement and Engagement (PPIE) activities should complete the normal Ethics application form but are asked to declare this during the application process (Screenshot 1.10). The HREC will then review the project application during the agreed seven working days for both project applications deemed low and high-risk.
4.1 Supporting Documents
Regardless of whether you have selected any high-risk questions, you will be asked to submit supporting documentation with your project application.
Templates to assist you in preparing your supporting documents can be found on the Human Research Ethics webpage. You will need to prepare your documents and save them to your computer ready to upload before beginning your project application.
Please note the application system will only support Word or PDF document types. Please do not use other document types or attempt to upload documents contained in a zip file as this can cause accessibility issues for the HREC.
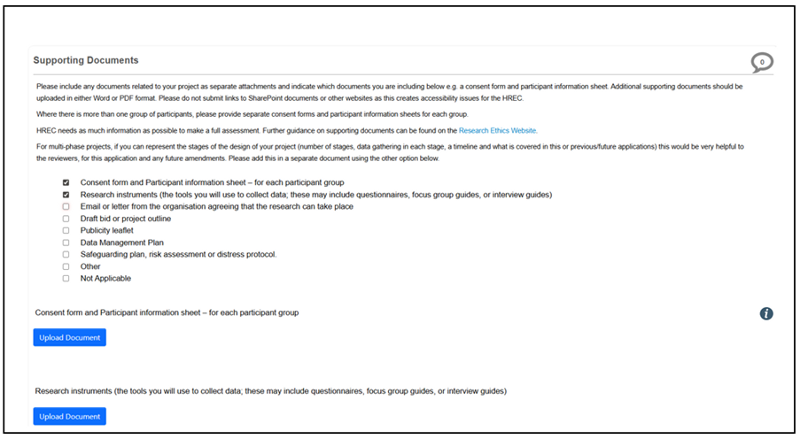
To upload a supporting document, select the checkbox next to the type of document you are uploading. Click on the blue Upload Document button that appears under the document type (Screenshot 1.11a).
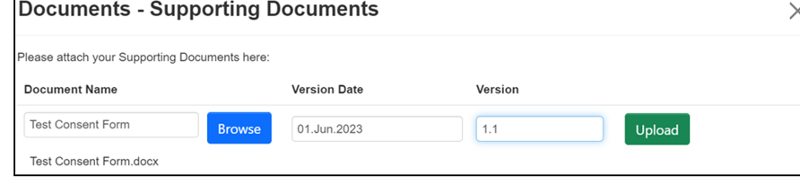
This will open the pop-up screen (Screenshot 1.11b). To add a document, click on the blue 'Browse' button and navigate to the document on your computer. Open the file to attach it and then complete the version date and version box. It is suggested you use a version number similar to that shown in the below screenshot (1.11b). If you need to send an updated version of this document during the review process, you could label it 1.2 and re-date it to indicate it is a newer version. All versions will be visible unless deleted.
Once you have completed the version information, click on the green 'Upload' button (Screenshot 1.11b), which will attach the file to your project application (Screenshot 1.11c). If you need to add more than one document for a document type you can click on the upload document button again under that document type (screenshot 11c) and repeat the instructions to attach it to your project application.
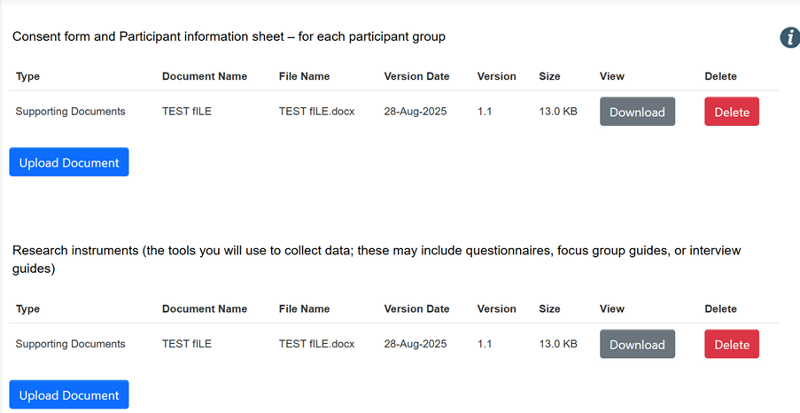
You will need to repeat the above for each type of document that is relevant to your project application by selecting the relevant check box and uploading the document as described above. If you need to remove a file, you can do so by clicking on the red 'Delete' button (screenshot 1.11c) up until you submit the project application to HREC.
4.2 Submitting your application
You will be asked to confirm the declarations and provide an electronic signature for your project application before your application can be submitted (Screenshot 1.12a).

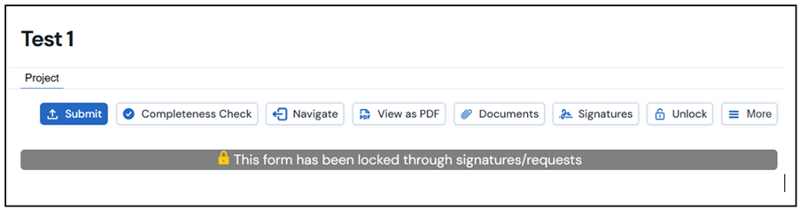
Once your project has been signed, the form will lock and you won't be able to edit it. If you need to make any changes you can unlock the form using the unlock action (screenshot 1.12b) up until you submit the application to the HREC.
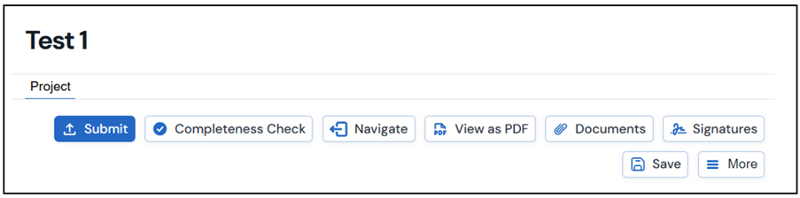
Once you have signed your project, you must click on the submit button to complete the submission (screenshot 1.12c). You will receive an email to your OU email address confirming your project application has been successfully submitted. If you are a postgraduate researcher, you will need to do this once you have received your supervisor's signature as detailed below.
If you are a postgraduate researcher, your supervisor will additionally need to sign your application before you can submit it to HREC. This will usually be your lead supervisor, but if they are unavailable, and you have a second internal supervisor, they may sign your project application. External supervisors will not have access to the System and cannot be a signatory.
You can request your supervisor’s signature by clicking on the blue 'Request Signature' box (Screenshot 1.13) and entering your supervisor's email address. Your supervisor must have previously logged into the Research Ethics Application System for their email address to be recognised. If their email address is not recognised, please ask them to do this first and this should resolve the issue.
Your supervisor will receive an email link to their Open University email address which will allow them to review and sign off your application. Alternatively, they can go directly to the Research Ethics Application System where they will find your application under the Signature tile in the main work area.
Please note your project application is now locked (screenshot 12.b) and will unlock once your supervisor signs your application. You may wish to inform your supervisor before submitting this request, to ensure they are looking out for it.

Once your supervisor has signed your project application, you will receive an email notification from the system to submit your project application to HREC. Please ensure you complete your submission by clicking on the 'submit button' (Screenshot 12.c). You will receive an email to your OU email address confirming your project application has been successfully submitted.
5. How an application is reviewed
Low risk project applications will be reviewed by a member of the HREC Chairing team. Project applications with a higher risk will be reviewed by two members of HREC, usually one internal member and one external member, before being reviewed by a member of the Chairing Team.
An initial review will usually be carried out within seven working days for low-risk applications and three working weeks for high-risk applications. It is usual that in any review of a study there will be queries raised, requests for clarifications or suggestions offered by the HREC before a favourable opinion is issued. You should expect to be asked to provide additional information or supporting documents during this process. This period of dialogue is for the HREC to better understand your project, positionality and research context in order to support ethical decision-making and should be factored into your timeline. In some exceptional cases where a project is complex or very high-risk, this could take several months. You are advised to submit your project application in good time before you intend to commence your research to allow sufficient time for this process to be concluded and a favourable opinion issued.
Once HREC is satisfied with your project, they will issue a favourable opinion and you will be able to begin your research.
It is important you do not approach any research participants until you receive the HREC favourable opinion. Additionally, if you require approvals from any other teams, such as data protection or the student research project panel (SRRP), you must wait for these approvals to be in place before commencing your research.
5.1 Completing changes requested by the HREC team
It should be expected that in the majority of cases your project application will be returned to you after the initial review for further information and clarification. This may include change requests, additional supporting documents required, or to complete the high-risk questions if you have not already done so because the Chairing Team consider your project to be high risk. You will be notified by email if this is the case and be supplied with a list of what is needed as a letter attachment. These will also appear as comments within the project application. Please refer to section 5.3 for guidance.
When a project application is returned to you for changes, the form will automatically unlock, and you will be able to access it from your Project Folder and amend it as necessary. Edits can be made directly into the relevant question or by adding additional documents. The HREC will be shown these question edits as track changes and there is no need to highlight these in the project application. You should, however, use track changes to highlight any changes to supporting documents that you are attaching to your project application.
Once all edits are complete, you will need to re-sign the project application and press the submit button again as detailed in section 4.2 to return it to the HREC for further review.
5.2 Completing a Full Application requested by HREC
If you are required to complete a full application, you must indicate this in the risk questions in order for a high-risk project application to be created. Selecting any of the options in 12.2 will create the high-risk project application, but you can also check the box where it indicates a full application has been requested by HREC (Screenshot 1.14).

You will need to complete the additional questions generated and make any other edits requested as detailed in section 5.1. Please ensure you re-sign your project application and press the submit button to return it to the HREC (section 4.2).
5.3 Receiving Comments from HREC
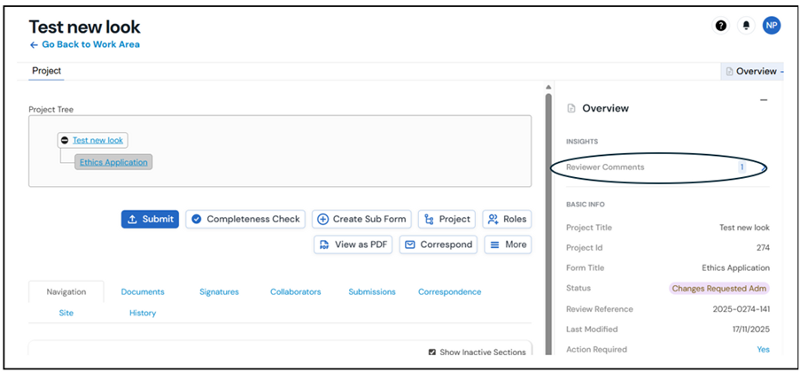
A copy of any comments made by the HREC Chairing team on a specific question will be shown in the letter you receive. You can also view these comments from the Overview menu on the right-hand side of your project application toolbar (Screenshot 1.15).
This will open a list of any comments made by the HREC. Each comment is a hyperlink and will take you directly to the question referred to which will be highlighted (Screenshot 1.16).

You may also receive additional instructions in the letter which will not be shown here (Screenshot 1.15). Please do ensure you read and attend to all areas highlighted before resubmitting your project application. This helps to avoid the need for further revisions to be requested.
5.4 Receiving a favourable opinion
Once the HREC is satisfied that all ethical issues have been addressed, a favourable opinion email with a letter attached will be generated by the system and sent to your OU email address.
Please read the letter carefully as additional conditions may be included in the letter.
6. Submitting an Integrated Research Application System application to HREC
If your project involves NHS patients, you may need to submit an Integrated Research Application System (IRAS) application to the Health Research Authority (HRA) which will be reviewed by an NHS Research Ethics Committee (NHS REC). In these cases, HREC will review your IRAS application and recommend any amendments before you submit your IRAS application to the HRA.
Please first consult the OU HREC webpage offering guidance about this and the HRA approval webpages. The IRAS online guide provides guidance about the application process, as does the step by step guide to using IRAS to apply to conduct research in or through the NHS/HSC.
You will first need to have registered on the HRA’s IRAS system so that you can prepare your draft IRAS application to attach to your HREC project application.
When you are ready to submit your IRAS application to HREC, please follow the guidance in Screenshots 1.3 - 1.6 and complete the questions on the project application form until you reach question 10. By answering yes to this question, you will open the IRAS application route (Screenshot 1.17).

Click on the blue 'Upload Document' button to attach your IRAS application and any related documents. Answer questions 11 and 12 and check to agree to the statement (Screenshot 1.18).

Click 'next page' to continue answering the questions. There will be shortened number of these. Completing the submission is the same as in the process outlined in section 4.2.
Your application will be reviewed by the HREC. If any changes are required, they will follow the same process as in sections 5.1, 5.3 and 5.4.
Please note: On your IRAS application you will be asked to name your OU research sponsor before it can be submitted to the HRA. Professor Mark Brandon, interim Pro-Vice-Chancellor, Research and Innovation, is the named OU sponsor for IRAS applications.
Once you have received your HREC favourable opinion letter, this is the end of the process on the Open University online ethics system and you will need to move onto the HRA IRAS.
The HREC favourable opinion letter will act as the University's sponsorship letter for your study and you will need to attach this to your submission to the HRA.
Once you have done this, the IRAS will notify you that they have received the HREC favourable opinion as evidence of electronic authorisation from the OU sponsor. You will then need to use the HRA online booking service to book a review by an NHS REC. HREC and you, as the researcher, will be notified when the review is complete (or if the NHC REC requires any clarification revisions to be made).
7. Submitting a pre-bid project application
If you are submitting a pre-bid project application to HREC, follow the guidance in Screenshots 1.3 – 1.6. Complete the questions on the project application form until you reach question 6. If you answer question 6 as yes and question 6.1 as no, you will be taken onto the pre-bid application route (Screenshot 1.19).
Click on the blue 'Upload Document' button to attach your funding bid documentation.

Check 'I agree to the statement' (Screenshot 1.20) and then 'next page' to continue with the project application.

You will be asked a shortened number of questions. Please ensure you provide full details of the funder when prompted.
Completing the submission is the same as in the above process outlined in section 4.2 (Screenshot 1.12), but you will not be asked to check the declarations. Please ensure you click the submit button to complete your submission.
Your application will be reviewed by the HREC. If any changes are required, they will follow the same process as above in sections 5.1, 5.3 and 5.4. When HREC is satisfied with your project application a favourable opinion will be issued as described in section 5.4.
7.1 Submitting a full application following a favourable opinion
If funding is received for your project and you need to apply for a full ethics review, you can do so using your original project. You can find your project as shown in Screenshots 1.7 and 1.8.
Review your answers and when you reach question 6.1, change your response to 'yes' (Screenshot 1.21). This will then route your project application to the full application process. Review and answer the additional questions. The process for completing and submitting your project application is outlined in sections, 4, 4.1 and 4.2.

8. Amending a project which has previously had a favourable opinion
If there have been changes to a project you have previously been issued a favourable opinion for, you can submit an amendment form. Further guidance on the type of amendments that must be reported to HREC can be found on the Amendments to a research project webpage.
From your Work area (Screenshot 1.1), select the 'All projects' tile to locate the project you wish to amend. To create the Amendment Form, select 'Create Sub Form' (Screenshot 1.22).

Under 'Sub-Form', select the dropdown arrow on the right-hand side and select 'Amendment Form' (Screenshot 1.23). Click on the green 'Create' box to create your amendment form.

To start completing the amendment form, click on 'Project Details' (Screenshot 1.24).
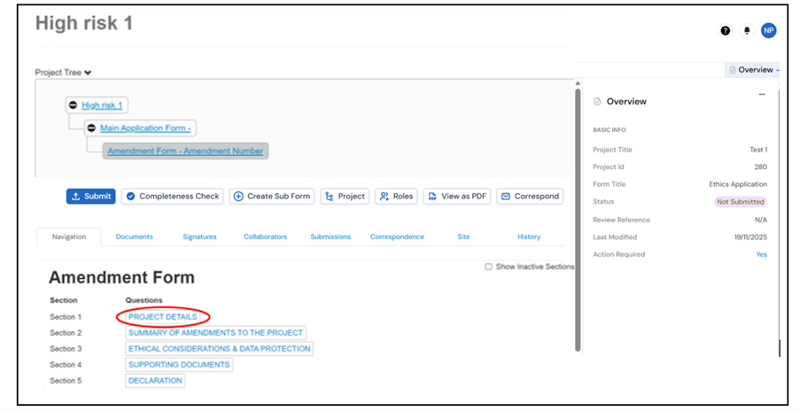
The amendment form contains a series of new questions and some information from your previous project application which may or not be editable. You should complete all questions as fully as possible. Most questions are compulsory, and you will not be able to submit the amendment form if a compulsory question is left blank. On the rare occasion a question is not relevant to your amendment, please enter N/A in the text box provided. You will be asked to attach any additional supporting documents in the same way you were asked when submitting your application (section 4.1).
Submitting your application for review is the same as described in section 4.2. You will be asked to confirm the declarations and provide an electronic signature for your amendment form before your form can be submitted (Screenshot 1.25a).
Please note if you are a postgraduate researcher, your supervisor will need to sign your from before you can submit it to HREC (Screenshot 1.13).

Once you have signed your project, you must click on the submit button to complete the submission. You will receive an email to your OU email address confirming your project application has been successfully submitted. If you are a postgraduate researcher, you will need to do this once you have received your supervisor’s signature.
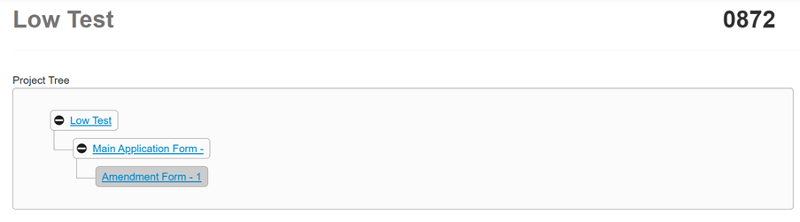
As with the main application, the HREC may ask you complete revisions before a favourable opinion is issued. This works the same as previously discussed in section 5.1. When you open your project application from the work area, please ensure you select the amendment form from the project tree (Screenshot 1.25b).
Selecting the main application form will take you to the original project application, which you won't be able to edit.
9. Submitting a final report
At the end of your project, you will be asked to submit a final report. You can do this from your original project application. You can find your project as shown in Screenshots 1.7 and 1.8.
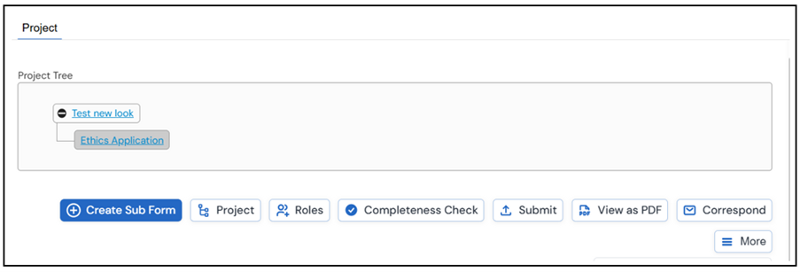
From the toolbar, select the 'Create Sub Form' option (Screenshot 1.26).

Under 'Sub-Form', select the dropdown arrow on the right-hand side and select 'Final Report' (Screenshot 1.27). Click on the green 'Create' box to create your Final Report.

To start the Final Report, click on 'Page 1' (Screenshot 1.28).
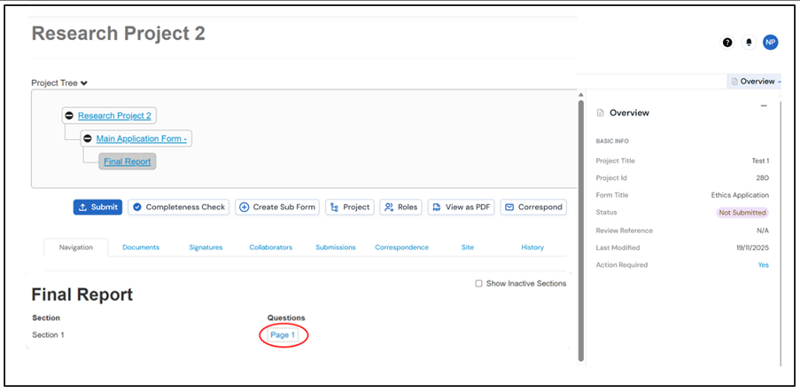
The Final Report contains a series of questions. You should complete all questions as fully as possible. Most questions are compulsory, and you will not be able to submit the Final Report if a compulsory question is left blank. On the rare occasion a question is not relevant to your final report, please enter N/A in the text box provided.
You will be asked to provide an electronic signature for your Final Report before your form can be submitted. Once you have signed your project, you must click on the submit button to complete the submission. You will receive an email to your OU email address confirming your project application has been successfully submitted.
10. Sharing a Project
You are able to share a project application you are working on with a colleague so they can proofread it or contribute to the project application if you allow them write access. This may be particularly useful if you are collaborating with others, or you are a postgraduate researcher and would like your supervisor to read your project application before you send the final version to them for signature. Please note you can only share a project with an internal colleague using the following guidance.
From the main application page, select the 'Roles' option (Screenshot 1.29).

You will see a pop up providing a number of possible options (Screenshot 1.30). Enter the email address of the person you wish to share within the space provided. The person you are sharing with must have previously logged into the Research Ethics Application System for their email address to be recognised. If their email address is not recognised, please ask them to do this first and this should resolve the issue.
Use the check boxes to select the permissions you would like them to have. If you select 'Read' the person you share with will only be able to read the project application but not make changes. If you would like them to be able to amend the project application, check the 'Write' box. Any changes made will appear in real time on your version of the project application.
Usually, it would be expected that the PI submits the project application. However, you may occasionally need someone else to be able to submit the project application on your behalf, for example if you are unwell or away. Selecting the 'Submit' check box will give the person named in the email the ability to submit the form. You will also need to select either the 'Read' or 'Write' check box depending upon whether you want the other person to be able to make changes before submitting the project application. You can also select some or all of the additional options if you would like the other person to have full access to receive notifications and/or create and submit an amendment or final report form.

Please note your colleague will need an OUCU and password to access the project application form.
If you need to share your project application with someone external to the University, such as an external collaborator, you can download a PDF copy to email to them to view but you will need to add any edits they make yourself to the online project application. To do this select 'View as PDF' (Screenshot 1.31). You will be able to open the project application as a PDF and save a copy to your computer, which you can then share by email.
11. Transferring a Project Application to another user
It is possible to transfer a project application you have created to another user. It is unlikely you will need to use this feature unless you will no longer be involved in a project that you have already created a project application for.
Please note once you transfer a project to another user, you will lose access to it and will no longer be able to see it in your Work Area.
If you need to share a project with another member of your research team to view or complete on your behalf but still need to be able to view it, you should use the 'Share' option (Section 10) rather than the 'Transfer' option.
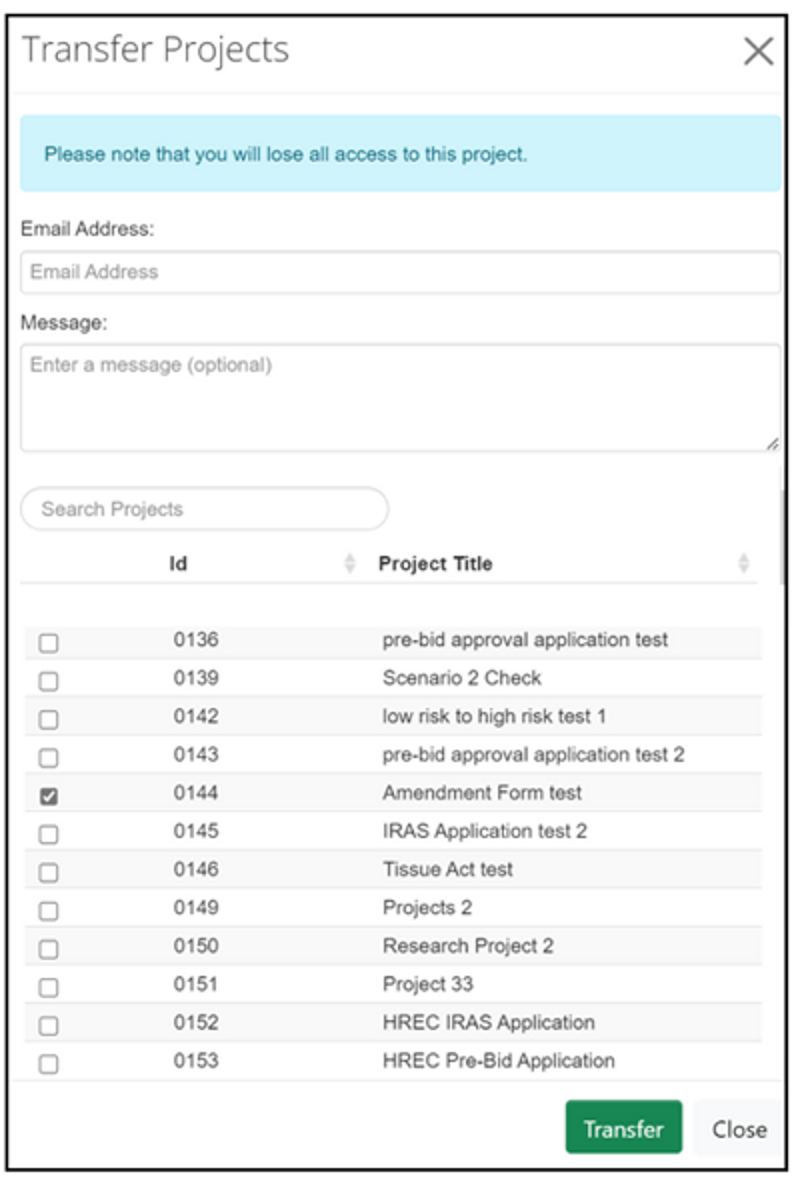
To transfer a project, you will need to be in the main Work Area. Select 'Transfer' action (Screenshot 1.32).
A list of project applications available to transfer will be displayed (Screenshot 1.33). Select the check box next to the project you want to transfer. Complete the email address of the person you are transferring the project to where indicated. The person you are sharing with must have previously logged into the Research Ethics Application System for their email address to be recognised. If their email address is not recognised, please ask them to do this first and this should resolve the issue.
Complete the 'Message' box. Click on the green 'Transfer' button.
The person receiving the transferred project will need the press the 'Accept Transfer' action in their own area to complete the transfer and receive full edit permissions. There is also the option to reject the transfer if required.
12. Contact us
If you have any feedback on this guidance document or require any further assistance, please contact the Human Research Ethics team.
13. Frequently asked questions
An initial review will usually be carried out within seven working days for low-risk applications and three working weeks for high-risk applications. It is usual that in any review of a study there will be queries raised, requests for clarifications or suggestions offered by the HREC before a favourable opinion is issued. You should expect to be asked to provide additional information or supporting documents during this process. This period of dialogue is for the HREC to better understand your project, positionality and research context in order to support ethical decision-making and should be factored into your timeline. Exceptionally some complex or very high-risk project applications may take several months to reach a favourable opinion. You are advised to submit your project application in good time before you intend to commence your research to allow sufficient time for this process to be concluded and a favourable opinion issued.
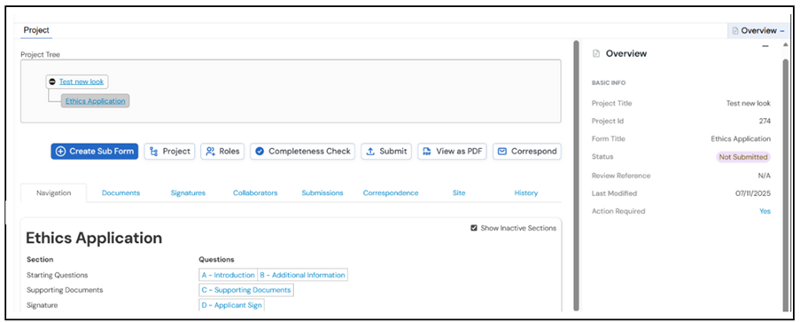
Can I see the current status of my project application?
You can see the current status of your project from the main 'Overview' menu shown on the right-hand side (Screenshot 1.34). The Overview menu can be minimised by clicking on the minus sign and maximised by clicking on the plus sign. The status will tell you the current status of your project application and action required will indicate if actin is required by you, the applicant. If action required is 'yes' then there is action for you to take. The 'yes' is a hyperlink and clicking on it will open a list of the actions that are needed. Additional information about application type and date modified is also available. As the project progresses through the review stage these fields will be updated so the applicant can see where their project currently is and whether they need to take any action.
Your supervisor or collaborator must have previously logged in to the Research Ethics Application System for their email address to be recognised. If their email address is not recognised, please ask them to do this first and this should resolve the issue. Please email the HREC team if the issue persists as some non-research OU staff may not have automatic access.
Once you have signed your project application you must also click the submit button to complete submission. You can check the status of your application and confirm it has been submitted as shown in the Can I see the current status of my project application? FAQ. Please also note that notifications will come from an @infonetica email address and may be routed into your junk folder.
If your project application is with you the applicant either before you submit to the HREC for the first-time or because you have been asked to complete revisions, the form will automatically be unlocked for editing. Once you sign the project application the form will lock ready for submission. If you change your mind and need to complete further edits you can unlock the project application again by clicking on the unlock action.
You will not be able to unlock a project application which has been submitted for review or has received a final outcome, usually a favourable opinion. If you need to amend a project that has received a final outcome, you will need to use the amendment sub-form (section 8).
HREC is seeking new internal members


Explore

Undergraduate
Postgraduate
Policy
-
Follow us on Social media
-


